Getting Inbox Zero’d: How and Why to Archive in Gmail

This post is part of my Getting Inbox Zero’d series that will provide all the tools and nitty gritty details necessary to get right if you truly want to hit inbox zero.

Since showing is ten times better than explaining, this series will be captured on YouTube with the most important points from the transcript included below.

Bottom line: Please watch the video first — it has everything you need all baked right in.

Enjoy!


Reasons why you should archive:

  1. SEARCH. With Gmail or Outlook (I’ll explain Outlook at the end), you can search and retrieve any email you might ever need — no reason to keep them in your inbox.
  2. CLARITY. When you archive emails that no longer require action, only the emails that require action remain in your inbox — making it very easy to see what emails you have left to action or respond to. To further illustrate, would you keep paper copies of bills that you have already paid lying around? In the same fashion, you should also archive emails that serve no value lying around cluttering up your inbox.
  3. ACTION ITEMS. Finally, if you use your inbox as a to-do list (which by the way is a terrible idea — go to joshevilsizor.com to find out out why), but if you use your inbox as to-do list, this will leave only action items in your inbox.

Terminology:

Inbox: This is where all of your email lands — and if you do nothing with it — this is where your email stays.

All Mail: This is also where all of your email lands. The only way to remove email from your All Mail is to delete it, and unless it’s junk mail or a large file that you no longer need, there is no reason to ever delete emails.

Archive: The word archive is a verb. When you archive an email you are simply removing the Inbox tag. When you remove the inbox tag, the email then only appears in your All Mail or of course, when you search for the email from your inbox (remember, search is generally always the easiest way to find old emails — the days of folders and categorizing are long gone).

7 Reasons Why Your Inbox is a Terrible To-Do List

Many people — my past self included — operate from their inbox, using it as a to-do list.  I mean, it makes sense; email is generally how most offices communicate and direct work — so why not, right?

Here’s why not.

1. You can’t prioritize an inbox (even with Gmail priority inbox)

If your inbox is your to-do list, which emails do you complete first? Bottom up, or top down? Regardless of your workflow, if you’re using emails as action items (instead of capturing them in a prioritized to-do list), you will never be actively managing the things you need to do. Instead, you are now simply reacting, in order of email timestamp, to other people’s requests.

Further, what happens when other people’s requests outrun your ability to get work done? You lose the ability to focus on the tasks (and/or emails) that are actually important. Anyone, that argues differently is not being honest with themselves. Yes, I’m talking to you Mr. “Mark as Unread.” Bolding your emails only works in the short-term, and then ultimately fails you completely when your inbox grows to more than one page.

More on this one, keep reading.

2. It’s easy to lose track of important items

Managing your email requires that you remove completed emails from the congested mess that is your inbox. If you use an inbox as a to-do list, what happens when that really important unread email gets pushed to page two? The task has just left the building! I hope your memory is good. Or maybe you’ll get through the other 50 unread messages and unbury that email from your boss (from last week) just in time to realize the deadline has passed? Not likely.

3. Email subject lines are not clearly conveyed action steps

A to-do list looks like this:

  1. Buy milk
  2. Feed the dogs
  3. Read chapter 2 of of the PMBOK guide

A to-do list does not look like this:

  1. Re: Meeting on Friday
  2. Fwd:  Please review
  3. Hi!

Unless your inbox is your to-do list.

Certainly some email subject lines are written well enough that little or no further reading is required to complete the associated task. However, for all other emails you are now required to open each email (that you’ve already read, mind you) and refresh your memory on (1) exactly what the email was about and (2) what it was that you intended to do in order to accomplish the associated task. The only way anyone could possibly be more inefficient would be to also print emails.

4. Important details get buried

If you have to dig around looking for the information you need to accomplish a task, for every item on your to-do list, you have effectively doubled or tripled the amount of time it takes just to start a task! This is what happens when email contains your to-dos. Think about how much time you spend returning to emails over and over again, or worse, searching fruitlessly for a particular email in an effort to find specific information needed to accomplish a task. If you are like most people who use email as a to-do list, you spend way too much time searching, reading (and re-reading), processing and determining your next moves.

Some might argue, “I keep my emails as to-do items because they contain relevant back-traffic necessary to accomplish the task.” This is would be a valid argument, except that copy/paste is a thing (unless you are still using only pen and paper for your to-dos — if so, contact me immediately for some urgent help). Additionally, most to-do list programs or apps have a notes section for this exact purpose. Many apps also have an active inbox and an email address to send emails that are automatically converted into a to-do item (the key here is to edit the subject line before you send it, or whenever your process your list of to-do items).

5. Working to an inbox is prioritizing your day around other people’s requests, not your requirements

If you are using your inbox as to-do list, ultimately, your agenda becomes an assortment of other people’s requests. If this is the case, where are the things you need to do? Unless you email yourself, it’s not in your inbox, that’s for sure.

More on this one, keep reading.

6. Working from your inbox requires two to-do lists

If your inbox is your to-do list, where do all your priorities reside? Anyone who uses their inbox as a to-do list that also has priorities outside their inbox absolutely requires a separate to-do list (anyone without perfect memory at least). So in this case what remains are two separate to-do lists, one in random order (the inbox), and one prioritized list. What a mess. Why would anyone purposely do this to themselves?

7. Your inbox is a moving target

If the inbox is where you organize your day-to-day work, every new email changes your to-do list. Worse yet, random things — of varying importance and at random intervals throughout the day — are added to the list. This creates creates a continuous onslaught of distractions severely limiting your ability to focus and ultimately killing your productivity every day.

Summary

If you are using your inbox as a to-do list, you are working from a non-prioritized, random and constantly changing list of things to do; a list dictated by others that may or may not actually be important to you or your success that day… or ever.

The solution

  1. Find a trusted to-do list app or system — I listed a few options in an earlier post.
  2. Follow my three simple steps to maintaining inbox zero, every day.

That’s it.

Inbox Zero: You are Doing Email Wrong (Step 1)

Ever leave the office and realize that the only “work” you actually accomplished was answering or sending emails?

If this has ever happened to you, or happens to you often — and you want to actually get real work done — please keep reading.

I should also state up front that I don’t consider processing email to be actual work (unless of course, your job is somehow 100% email-driven and/or you perform a customer service function). Email is simply a communication tool, albeit an incredibly misused one (more on that in a separate post). As such, my goal in these next three posts is to free your inbox so that you can get back to getting real work accomplished.

This particular discussion covers the most efficient way to accomplish step one of my inbox zero methodology:

  1. Check email
  2. Complete/capture email
  3. Close-out email

Or simply, how to “do email right.”

How to do email right

I have been managing five inboxes successfully (i.e. maintaining inbox zero) for the last five years. I have done this by adhering to three simple fundamentals. They are listed below.

  1. Avoid sending email
  2. Establish a battle rhythm
  3. Batch process emails using step two of my inbox zero methodology

Avoid sending email

Unfortunately, email begets email — so stop sending emails.

Look at your inbox, right now. How many emails in your inbox are responses to emails that you originally sent? How many of those will you respond to? And how many of those will prompt another response? It’s a terrible cycle, and it can be avoided by using at least two much more efficient options: phone calls and meeting agendas. When to employ these preferred options varies depending on the situation, but either one of them is more efficient than an email conversation. Using these options instead of just “banging out a quick email to Bob” also requires a significant amount of willpower and/or a trusted personal organization system. However, once a trusted system is in place, the willpower requirement is significantly reduced or eliminated. I will explain the organization element in another post.

So when is it efficient or appropriate to send an email? The simple rule of thumb is to ask yourself, “Will this email solicit an unwanted email response?” If the probability is “likely” or greater, then use one of your other two more efficient options (phone/meeting).

Here are some examples of efficient or appropriate use of email:

  1. As a follow-up to a discussion (phone/meeting) that includes information or files that were already promised or discussed (i.e. nothing new is being introduced)
  2. Sending FYI-type information to one or more people (i.e. no action or response required)
  3. Requesting a file from a person who will understand exactly what is being requested (i.e. a standard request)
  4. Anytime zero responses are guaranteed!

Establish a daily battle rhythm

What’s a battle rhythm? A battle rhythm is simply a dependable daily routine. The primary reason for establishing a daily battle rhythm is to ensure that key work inputs are reviewed every day so that correct priorities are established before beginning any work. Sticking to a battle rhythm also helps to avoid getting sucked into processing emails before first determining what’s most important to accomplish that day.

A battle rhythm should include all the key input processing tasks that need to be accomplished each day. For the average office worker or executive, a battle rhythm should include the same general series of tasks: calendar management, processing email, managing to-do lists, and doing actual work.

My daily battle rhythm looks like this:

  1. Open to-do list (GQueues)
  2. Open email, select calendar (avoid eye contact with the inbox at all costs!)
  3. Review the week ahead
  4. ID all key events that will require action and capture those in my to-do list
  5. Prioritize to-do list
  6. Accomplish 3-5 key tasks on my to-do list
  7. Batch process emails
  8. Repeat steps 5-7

If the idea of accomplishing real work before checking email is alien and unthinkable, it is absolutely possible to swap steps six and seven for the first round of the day only. However, keep in mind that if you are not able to start your day without checking email, ultimately, everyone but you is driving your priorities at work.

Batch process email

To batch process email means processing every email in your inbox without stopping or working on anything else. The keys to doing this most efficiently are (1) to follow step two of my inbox zero methodology and (2) process email at pre-determined times during the day.

This particular tenant of “doing email right” might be one of the hardest, simply because it involves a significant amount of willpower. The desire to accomplish the easy task (responding to the email) instead of the more complex or less pleasurable task, is a daily battle for many.

The simple truth, and the ultimate case for batch processing email, is that processing email all at once — instead of multiple or hundreds of times throughout the day — is absolutely the most efficient way. There are numerous articles explaining why responding to emails throughout the day is woefully inefficient (and considered multitasking, which is also terrible), so I will not belabor the point here. I will however, happily provide some methods for avoiding it.

Here are some additional tips to avoid email multitasking

  1. Establish times in your battle rhythm to process email, and stick to them
  2. Turn off all email notifications (e.g. smartphone lights/sounds, desktop notifications/sounds)
  3. Check email only at established times throughout the day, no matter what
  4. Let subordinates/peers/supervisors know that if they need something from you immediately, that they should stop by or call (most good leaders should know/do this already).
  5. If you are fortunate enough to be able to shape company culture, strive to create a climate where employees don’t feel required to respond to emails within minutes — it’s hurting your business

In summary

  1. Don’t send email unless you‘re guaranteed to not get a response
  2. Establish a battle rhythm that includes a time to batch process emails — and stick to it!

Stick to these simple concepts and I guarantee that you will find yourself with much more time to accomplish your priorities.


Inbox Zero: The Two Most Important Steps to Email Freedom (Step 2)

Do you need a simple process to keep your inbox empty? Need a process that you can remember? Need a process with just one decision to make, every time? If so, take a second to see if this straightforward approach to inbox zero is for you.

The simple truth is, I’ve never read Getting Things Done and I had never seen Merlin Mann’s inbox zero video until a few weeks ago. However, at one point in my life I did have three separate careers and five email inboxes that were threatening both my marriage and my sanity. It was the email or me, and I won.

How did I win?

I won using a very simple, 100% repeatable, dummy-proof set of rules to guide how I process emails every day. This process works because I didn’t invent it out of boredom or curiosity.  It was born purely out of necessity — sink or swim. Most importantly, it has been forged, tested, and proven on the battlefield of my own personal work/life balance. The entire process itself could not be more simple:

  1. Check email
  2. Complete/capture email
  3. Close-Out email

I am going to skip discussing step one because everyone knows how to check email (well, sort-of — stay tuned for my to-be-published batch email processing discussion).

I am also going to skip discussing step three because I already covered how to close-out email in my last post: Inbox Zero: The Key to Less Email is No Email.

This article addresses the two steps (or decisions) that are the core components to attaining and maintaining zero emails: complete email or capture email.

How to keep it simple

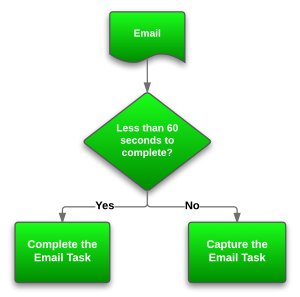
The concept is straightforward and simple.  When you open an email, you have two options: complete the task associated with the email or capture the task associated with the email.

If the task associated with the email takes less than 60 seconds, complete the task.

If the task takes more than 60 seconds, capture the task. Do this using GQueues, Evernote, Keep, [insert your favorite to-do list app here], or using an old fashioned post-it note (or using the 2014 version).

In the event you’re a visual learner and are thus far thoroughly confused, I drew a diagram to illustrate the elegant simplicity:Final Capture_Complete

Why you have to keep it simple

When you remove all options but two, any possible “paralysis by analysis” about what to do with the email that might occur is eliminated and your actions become so binary (yes or no), the follow-on actions become almost automated. And of course, as you know, automating an action reduces the associated processing time from hours to minutes, or even seconds.

Now certainly, by adding a number of email tasks to my to-do list, my to-do list has grown. However, when I transfer tasks from my inbox to my to-do list, I am able to do two very important things:

  1. Create a single, clear, actionable task.  I do this by removing any ambiguity from the subject line of the email and by including any necessary details from the body the email in the actual to-do verbiage. For example, my email with the subject line RE: Invoicing Request becomes Conduct invoice audit on Friday.
  2. Prioritize the task. This is key. Now, instead of immediately trying to answer this email and wasting half of my day on an unplanned task, I’ve simply placed it on my list of action items for Friday.

As long as you attack your inbox and complete or capture using the 60-second rule — resisting the incredible urge to complete tasks that do not adhere to the 60-second rule — you will reach inbox zero every day, with very little effort. Guaranteed.

The only challenge with this process is moving from a trusted, incredibly inefficient system (your email inbox) to a new and as yet, untrusted system to manage your action items, projects, etc.  My challenge to you here is to spend 30 minutes today looking for that trusted system.

Trusted to-do list recommendations

I listed a few systems earlier in this post, and there are literally hundreds of apps, programs, and moleskine notebooks dedicated to managing your to-do list. I personally use GQueues to tackle not only my to-do list, but to manage just about every aspect of my scheduled life. I prefer GQueues for a few simple but important reasons:

  1. It integrates with Google Calendar and sends reminders via pop-up, sms, or email
  2. It’s highly collaborative (I can assign, share, and receive tasks)
  3. It’s highly customizable to suit my personal organization style (I use the GTD set-up)
  4. The drag and drop user interface is incredibly simple to manipulate
  5. It does 100% of what I need it to do and requires zero plug-ins, add-ons, or workaround measures
  6. I’m able to add tasks on the go with only two phone gestures (or just one Google Now voice command)

But I digress.

Before this turns into a full-blown GQueues or to-do list post, I will end here and challenge you one more time to spend time today to find a trusted system. If you already have one the next step is easy — begin tackling and conquering your email with that simple yes or no question.

Inbox Zero: The Key to Less Email is No Email (Step 3)

If you’re interested in reaching inbox zero using simple, sustainable processes, and you want to learn the most successful strategy from the very beginning, this is where you start.

Whether your inbox currently has 50, 100, or 1,000 emails, functionally it works the same as everyone else’s.

Every email inbox is the same in that they all have:

An email in folder (i.e. inbox)
An email sent folder (or label)

So what is the most important element that separates successful inbox zero-ers from everyone else?

An email completed folder

No matter what methodology you might subscribe to (GTD, inbox zero, etc.) the completed folder is the foundational building block necessary to reach zero emails. What this folder looks like, how it functions, and what it is named varies depending on each user’s preferred email platform.

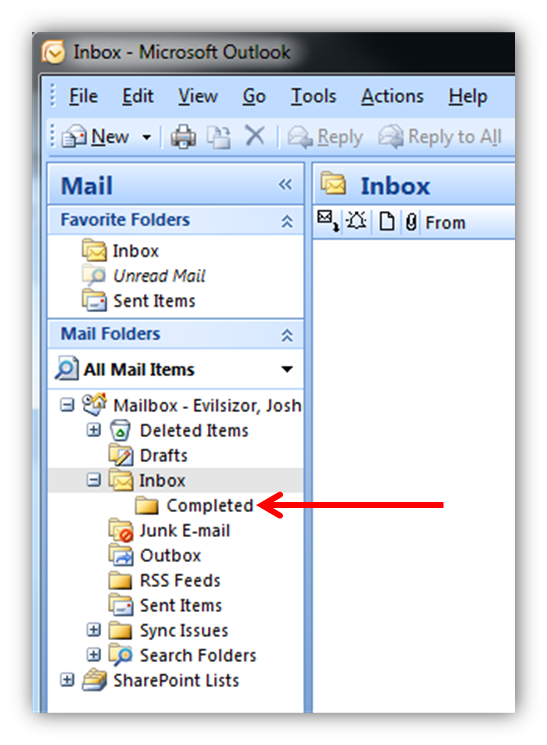
If you’re using Outlook, it’s simply a folder.

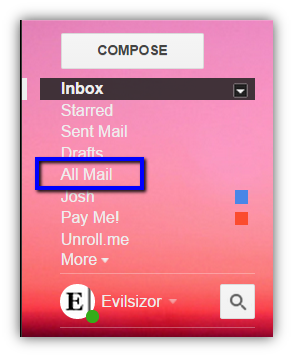
If you’re using using Gmail, it’s the All Mail archive (and perhaps a label).

If you’re using some other service, it might be something else.  They key is, moving the email out of your inbox to this location — every time — once the information or action associated with the email has been captured or completed.

So in summary:

  1. Check email
  2. Capture or complete email task
  3. Close-Out email by moving it to a completed folder

The lack of a reliable capture system leads to email hoarding and is generally why most people will never attain inbox zero.

The reason people fail to follow all three steps — every time — is because they lack a reliable, fail-safe system that allows them to completely capture information or complete tasks associated with the emails they receive. Since they are unable to completely capture/complete email tasks, they are then unable to discard or remove those emails from their inbox and they begin hoarding.

A few simple reasons people hoard emails in their inbox:

  1. Procrastination. The email contains a small or large task that the hoarder continues to put off until later.
  2. Awaiting Follow-up. Most likely, this email was a request from someone. Because the hoarder didn’t have some or all of the required information to answer, they forwarded it to someone else for additional information. Keeping the original email in their inbox is a daily reminder that they are awaiting follow-up from that person.
  3. Information. The hoarder feels that they might need the information in the email sometime in the near or not-too-distant future.
  4. Other. Insert the one million other reasons hoarders do not do what is most efficient – get rid of the email!

Email hoarding is guaranteed to prevent inbox zero 100% of time. I know this to be true because I used to do every single one of the things listed above. I even used to brag about how well I used my inbox as a to-do list (although inefficient, I was good at it). Regardless, those were very dark times.

To illustrate the futility: How many times have you created a to-do list right when you first got to work, and then left work with items unfinished? Probably a better question would be, when have you ever completed every item on your to-do list before leaving work?

Rarely or never is exactly the truthful answer. This is why you’ll never hear anyone talking about to-do list zero — it is unattainable. There will always be more to do.

So if you’re an email hoarder and you understand how to-do lists only grow, and never shrink, why would you ever use your inbox as a never-ending hub for persistent follow-up reminders, random data center facts, and an ever growing list of things to do for other people?

The detailed physical mechanics of reaching inbox zero

Moving completed emails in Outlook is done by left-clicking and dragging emails from the Inbox to the Completed folder.Inbox Completed Folder Outlook

This is done in Gmail by archiving emails. Gmail_Inbox

Those are the physical mechanics, and obviously simple enough for anyone to master.

The part that’s actually difficult about putting an end to email hoarding is understanding exactly what must be done, in any scenario, in order to squeeze the last drop of importance from an email and truly remove it (from your inbox and your hippocampus). I’ll explore the numerous ways to capture and complete email tasks in another post.

In summary

The only way to achieve less email (and ultimately zero email) is to eliminate email hoarding. The only way to eliminate email hoarding is by completing the following steps, every day:

  1. Check email
  2. Complete/capture email
  3. Close-Out email

In case you’re wondering – yes. This article just broke down in great detail, the last step in the Evilsizor inbox zero methodology; closing out email. If you’re interested in steps 1-2 please stay tuned (if you’re reading this in real time) or just navigate to the next post (if you’re reading this any time period greater than a few weeks from today).

My challenge to you is to take the first couple steps.  If you’re a Gmail user, learn how to use the archive function.  If you’re an Outlook user, add a completed folder (or maybe get rid of the too many folders you already have but fail to use). Then, the next time you receive an email, render it inert and close it out.

That’s all there is to it.

Optimize your Gmail for Inbox Zero

I’m certain there are one million articles dedicated to teaching others how to set up a Gmail account. This is not one of them. This article describes how to set up a Gmail account correctly. By correctly, I mean a Gmail account tailored to fully capitalize on the Evilsizor productivity method for easily achieving and consistently maintaining inbox zero. (This is an idea we will develop and explore through a series of to be published articles on this site.)

I am also not going to explain why Gmail is still the best email option available amidst the sea of other platforms — for business or personal use. That is also a discussion for another article. In this article, I’m going to highlight and/or expand on each of the important setup options covered in Gmail’s current new user tutorial (as of this writing), along with a few other options necessary to learn or enable within Gmail.

So if you’ve been considering making the move to Gmail but you don’t really know where to start, or if you just want revamp your approach to using Gmail, please continue reading.

In this article I will cover the following items:

1.  I will walk through the Gmail new user tutorial (that is launched upon logging in to a new account), highlighting and explaining each option that an inbox zero user should become familiar with (and why) and each option that a new user should disable or enable.

2.  I will also cover all of the additional options and labs (Google’s experimental options) that an inbox zero user should also enable and learn.

After completing all the steps outlined here, a new user will be 100% prepared to employ all the techniques I will later outline as part of my simple methodology for achieving inbox zero.

So let’s get on with it, shall we?

Note: The progression of steps, and the tutorials referenced in this article, are written for anyone that has never before established a Gmail account. Users that already have a Gmail account can follow along by viewing the tutorials discussed in this article, here.

First, navigate to Google > select Gmail > select Set up an account.

Next, carefully select a username that will be with you the rest of your life — no pressure! (Pro tip: Something unique is always better than Brad8675309)

Finally, log in.

Once you’re in, Gmail will run a number of introductions, along with some highlights for a few of the really cool things Gmail can do.

Two of the introductions that you’ll see are necessary to address here:

  • Inbox tabs
  • Themes

Inbox tabs.  In an effort to help us be productive, Google (or Gmail) has developed quite an array of tools that we can put in our toolkit. Most of them are incredible. Unfortunately, in an effort to keep life (or email) simple, some of the tools that Google provides don’t fit or belong in the Evilsizor inbox zero toolkit. Inbox tabs are one of those unnecessary tools. I’ll explain why in a later post, but I wanted to make clear that just because there is a blowtorch available, it doesn’t necessarily mean that it’s the appropriate or efficient tool for weed removal. This article will later address how to set up a Gmail account using the alternate and better option: priority inbox.

Themes.  Beyond the fact that it’s nice to have a sweet vacation picture or high definition mountainscape as a backdrop for your email interface, themes are most useful for users with more than one Gmail account. With different themes applied, switching between two different Gmail accounts is pretty straightforward, but potentially confusing without different themes applied (each inbox looks the same without a theme applied).

Once you’ve made it past all the introductions to your brand new inbox, read through all of the Gmail functionality tutorials that are offered to you (levels 1-4). By doing this, you’ll be introduced to and at least familiar with most of the goodness that Gmail has to offer. All of these tutorials cover the basics of how to employ these tools. In this article I will briefly explain why some of these tools are great. However, I will more completely explain the why, along with advanced employment techniques, in future posts. Be sure to sign up for my RSS feed.

As you move through each tutorial and develop questions, be sure to click the “more” hyperlinks that further explain how to use each tool. All of the topics covered by Gmail are ones users should be familiar with, but the most important topics that are critical to understand, I’ve listed below (along with a brief explanation).

Gmail tutorials to which you should pay particular attention:

  • Conversation view.  Gmail works very differently than other email. Conversation view takes a little while to get used to, but so does riding a bike — which is much faster than your old tricycle. So stick it out, it’ll be worth it (trust me).
  • Archive function.  One of the single-most important functions of Gmail. Do your best to begin to understand the difference between your Inbox and your All Mail. I will of course, explain the difference in a future post.
  • Search.  Pay particular attention to the advanced search functionality.
  • Attachments.  The “Save to Drive” option is a great new addition to the inbox zero toolkit.
  • Starring emails.  This is a handy tagging device.  
  • Desktop notifications.  Distracting! This tool will absolutely not go in the toolkit. Highlighting it here to make sure users do not enable this option.
  • Labels.  Make note of the highlight and one-to-many functionality.
  • Undo Send.  Unlike Outlook, this one is simple and actually works.
  • Filters.  Another incredibly powerful tool when wielded correctly (there is some learning involved).
  • Priority inbox.  This is so important I have a separate section below explaining how to set up your priority inbox — instead of the tabbed inbox discussed above.
  • Density.  Unless you have poor eyesight, consider the compact option.
  • Keyboard Shortcuts.  I consider these almost an advanced user function, but if you’re comfortable with shortcuts already, consider learning the following simple shortcuts to get started: Forward (F) Reply (R) Next/Previous Conversation (J/K) and Archive (E)).
  • Email aliases.  Any small business owner wearing multiple hats should pay attention to this option.
  • Send + Archive.  A core component of inbox zero.

Of course, should you ever need help, the settings gear…
Settings Gear_Final
…will always take you to the Gmail help center.

There are of course, additional important steps necessary to get a brand new Gmail account up-and-running.  However, I won’t be covering those in this forum. Those steps are explained and presented in the Gmail tutorials, and listed only for clarity below:

  • Set up your mobile (follow the prompts)
  • Import contacts (follow the prompts)
  • Set your photo (follow the prompts)

As promised, now we’ll review how to set up a priority inbox.  We’ll also cover some important or handy tools not discussed in the tutorials.

Priority inbox.  This is the inbox setup that we alluded to at the beginning of this article. In case you’re nervous about tweaking settings in an unfamiliar Gmail environment, do not fear — many can be undone. In Gmail, a few of the more complex setups give you the option to revert everything back to the way it was before you started. This setup provides that option. Should you desire to hit the reset button, simply select “Reset Priority Inbox to default configuration” at the bottom of the priority inbox section.

Assuming you’re here to optimize your inbox the Evilsizor way, this is how you do it:

1. Settings gear > Settings (do not select configure inbox) > Inbox (tab)

2. Inbox type: Priority inbox (select from drop-down menu)

3. Inbox sections:

Click Options then select:  Unread, 50 items, hide section when empty
Click Options then select:  Starred, 50 items, hide section when empty
Click Options then select:  Important, 50 items, hide section when empty
Click Options then select:  Everything else, 50 items, hide section when empty

4. Set up everything else as you desire it (less important)

5. Save Changes

When you’re done, it should look like this:
Priority_Inbox_Setup_Final
Although it’s not critical that your priority inbox is set up exactly like the one explained and pictured above, what is critical is that (1) an Unread section is at the top, (2) an Important or Starred section is in the middle, and that (3) an Everything else section is at the bottom (we will later create filters to “push” unimportant email into this section).

Now that you’re all set up, take a moment to watch how priority inbox works: Priority Inbox Video

All of the additional options that are critical to harnessing the the power and efficiency of Gmail are listed below. Next to each of these I’ve identified where the options are available, a short why summary, and perhaps a tip or two to get you started. Each of these tools will have their own full-blown discussion and explanation on this site in the very near future.

  • Filters.  Filters are most powerful when automated and used in conjunction with labels. Set up your first filter from this location: Settings gear > Settings > Filters. Now follow these steps: Create a new filter > From [Insert the email address of someone important to you] > Create filter with this search > place a check by Apply the label > Choose label > New label [name the label appropriately] > Create > Create filter.  
  • Labels.  Manipulate these from your Gmail inbox home screen, or here: Settings gear > Settings > Labels. Labels are most powerful when automated by using them in conjunction with filters — AKA rules in Outlook parlance. Using the label created above, change the label color to a bright color and never miss an important email from this person again!

The rest of the options presented below can all be enabled in the Labs tab of Gmail Settings. There are many handy labs available, but I am only covering the labs either critical to employing the Evilsizor inbox zero methodology, or just necessary for increased productivity or efficiency. The steps to navigate to Labs: Settings gear > Settings > Labs

  • Apps Search.  This returns Google Drive documents (in addition to emails) as a part of the search results when you search your inbox, thereby saving you a series of clicks when you need to open something in Google Drive.
  • Auto-advance.  Automatically shows the next conversation (or email — remember emails are grouped in conversations in Gmail) instead of your inbox after you delete, archive, or mute a conversation. You can select whether to advance to the next or previous conversation in the General settings tab. This comes in extremely handy as you batch process emails (also a topic I’ll cover down the road).
  • Undo Send.  As I mentioned before, simpler to use than Outlook and it actually works. Just enable it already.
  • Send + Archive.  A core component of inbox zero. Learn to use it.  I would explain why, but it’s impossible to do so in a brief manner.
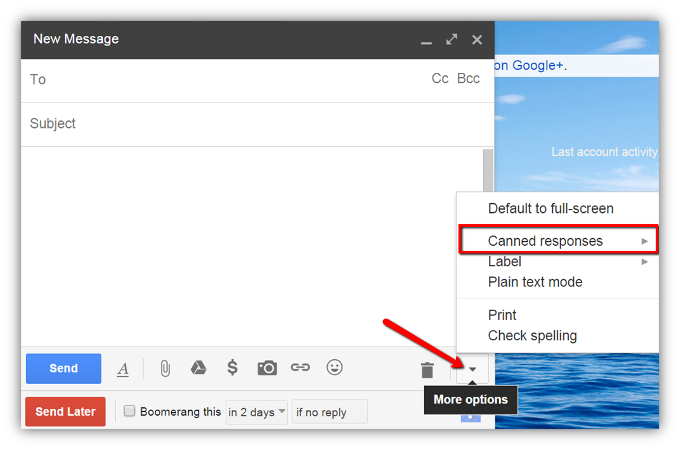
  • Canned Responses.  You can locate this option from the Gmail compose message screen as highlighted in the picture below. From here you can create new canned responses or insert canned responses into an email message. These are an incredible time saver for salespeople, recruiters, and others that send many emails and would benefit from easy access to multiple use email templates.
Canned Response_Final

That’s it.

Each of the items listed in this article are the primary tools a Gmail user needs to enable, use, and become proficient with in order to begin building their own personal Inbox Zero Toolkit (IZT). There are a few additional tools available that completely round out the Evilsizor IZT, and I will discuss each of those in detail in forthcoming posts.

Blogs are stupid

Okay, that’s not really what I meant.  I guess what I meant was, the word blog sounds stupid.  It always has — to me, at least.  And since this is my webpage (fine… BLOG), my opinion is currently all that matters.   Also, I think I may be starting off on the wrong foot, as the overtones in those first couple sentences could certainly be perceived as negative.

Let’s try this again.

All I really wanted to convey is my disdain for the word blog, and why I will never consider or call myself a blogger — no matter how many posts end up parked in this little corner of the interwebs. The purpose of this little word repository on the web will be threefold, and because bullet-ized lists are the new black, let’s do the numbers:

1.  A place to capture and organize all my thoughts on efficiency, organization, and organizational efficiency (commonly referred to in the blogosphere as “hacks”).  [Also, I hate the word blogosphere even more than the word blog.]

2.  A place to capture and organize all of the best high and low tech tools and personal techniques (i.e. mine) available to bring simplicity and order to this otherwise chaotic, always-switched-on world in which we find ourselves living and working.

3.  A place to park all the rest of my thoughts.

And that’s really it.  Now that I’ve completed my first post and the pressure’s off, let’s get on with it.  Shall we?

Thanks for joining me, let’s see where this thing goes.