
I’m certain there are one million articles dedicated to teaching others how to set up a Gmail account. This is not one of them. This article describes how to set up a Gmail account correctly. By correctly, I mean a Gmail account tailored to fully capitalize on the Evilsizor productivity method for easily achieving and consistently maintaining inbox zero. (This is an idea we will develop and explore through a series of to be published articles on this site.)
I am also not going to explain why Gmail is still the best email option available amidst the sea of other platforms — for business or personal use. That is also a discussion for another article. In this article, I’m going to highlight and/or expand on each of the important setup options covered in Gmail’s current new user tutorial (as of this writing), along with a few other options necessary to learn or enable within Gmail.
So if you’ve been considering making the move to Gmail but you don’t really know where to start, or if you just want revamp your approach to using Gmail, please continue reading.
In this article I will cover the following items:
1. I will walk through the Gmail new user tutorial (that is launched upon logging in to a new account), highlighting and explaining each option that an inbox zero user should become familiar with (and why) and each option that a new user should disable or enable.
2. I will also cover all of the additional options and labs (Google’s experimental options) that an inbox zero user should also enable and learn.
After completing all the steps outlined here, a new user will be 100% prepared to employ all the techniques I will later outline as part of my simple methodology for achieving inbox zero.
So let’s get on with it, shall we?
Note: The progression of steps, and the tutorials referenced in this article, are written for anyone that has never before established a Gmail account. Users that already have a Gmail account can follow along by viewing the tutorials discussed in this article, here.
First, navigate to Google > select Gmail > select Set up an account.
Next, carefully select a username that will be with you the rest of your life — no pressure! (Pro tip: Something unique is always better than Brad8675309)
Finally, log in.
Once you’re in, Gmail will run a number of introductions, along with some highlights for a few of the really cool things Gmail can do.
Two of the introductions that you’ll see are necessary to address here:
- Inbox tabs
- Themes
Inbox tabs. In an effort to help us be productive, Google (or Gmail) has developed quite an array of tools that we can put in our toolkit. Most of them are incredible. Unfortunately, in an effort to keep life (or email) simple, some of the tools that Google provides don’t fit or belong in the Evilsizor inbox zero toolkit. Inbox tabs are one of those unnecessary tools. I’ll explain why in a later post, but I wanted to make clear that just because there is a blowtorch available, it doesn’t necessarily mean that it’s the appropriate or efficient tool for weed removal. This article will later address how to set up a Gmail account using the alternate and better option: priority inbox.
Themes. Beyond the fact that it’s nice to have a sweet vacation picture or high definition mountainscape as a backdrop for your email interface, themes are most useful for users with more than one Gmail account. With different themes applied, switching between two different Gmail accounts is pretty straightforward, but potentially confusing without different themes applied (each inbox looks the same without a theme applied).
Once you’ve made it past all the introductions to your brand new inbox, read through all of the Gmail functionality tutorials that are offered to you (levels 1-4). By doing this, you’ll be introduced to and at least familiar with most of the goodness that Gmail has to offer. All of these tutorials cover the basics of how to employ these tools. In this article I will briefly explain why some of these tools are great. However, I will more completely explain the why, along with advanced employment techniques, in future posts. Be sure to sign up for my RSS feed.
As you move through each tutorial and develop questions, be sure to click the “more” hyperlinks that further explain how to use each tool. All of the topics covered by Gmail are ones users should be familiar with, but the most important topics that are critical to understand, I’ve listed below (along with a brief explanation).
Gmail tutorials to which you should pay particular attention:
- Conversation view. Gmail works very differently than other email. Conversation view takes a little while to get used to, but so does riding a bike — which is much faster than your old tricycle. So stick it out, it’ll be worth it (trust me).
- Archive function. One of the single-most important functions of Gmail. Do your best to begin to understand the difference between your Inbox and your All Mail. I will of course, explain the difference in a future post.
- Search. Pay particular attention to the advanced search functionality.
- Attachments. The “Save to Drive” option is a great new addition to the inbox zero toolkit.
- Starring emails. This is a handy tagging device.
- Desktop notifications. Distracting! This tool will absolutely not go in the toolkit. Highlighting it here to make sure users do not enable this option.
- Labels. Make note of the highlight and one-to-many functionality.
- Undo Send. Unlike Outlook, this one is simple and actually works.
- Filters. Another incredibly powerful tool when wielded correctly (there is some learning involved).
- Priority inbox. This is so important I have a separate section below explaining how to set up your priority inbox — instead of the tabbed inbox discussed above.
- Density. Unless you have poor eyesight, consider the compact option.
- Keyboard Shortcuts. I consider these almost an advanced user function, but if you’re comfortable with shortcuts already, consider learning the following simple shortcuts to get started: Forward (F) Reply (R) Next/Previous Conversation (J/K) and Archive (E)).
- Email aliases. Any small business owner wearing multiple hats should pay attention to this option.
- Send + Archive. A core component of inbox zero.
Of course, should you ever need help, the settings gear…

…will always take you to the Gmail help center.
There are of course, additional important steps necessary to get a brand new Gmail account up-and-running. However, I won’t be covering those in this forum. Those steps are explained and presented in the Gmail tutorials, and listed only for clarity below:
- Set up your mobile (follow the prompts)
- Import contacts (follow the prompts)
- Set your photo (follow the prompts)
As promised, now we’ll review how to set up a priority inbox. We’ll also cover some important or handy tools not discussed in the tutorials.
Priority inbox. This is the inbox setup that we alluded to at the beginning of this article. In case you’re nervous about tweaking settings in an unfamiliar Gmail environment, do not fear — many can be undone. In Gmail, a few of the more complex setups give you the option to revert everything back to the way it was before you started. This setup provides that option. Should you desire to hit the reset button, simply select “Reset Priority Inbox to default configuration” at the bottom of the priority inbox section.
Assuming you’re here to optimize your inbox the Evilsizor way, this is how you do it:
1. Settings gear > Settings (do not select configure inbox) > Inbox (tab)
2. Inbox type: Priority inbox (select from drop-down menu)
3. Inbox sections:
Click Options then select: Unread, 50 items, hide section when empty
Click Options then select: Starred, 50 items, hide section when empty
Click Options then select: Important, 50 items, hide section when empty
Click Options then select: Everything else, 50 items, hide section when empty
4. Set up everything else as you desire it (less important)
5. Save Changes
When you’re done, it should look like this:
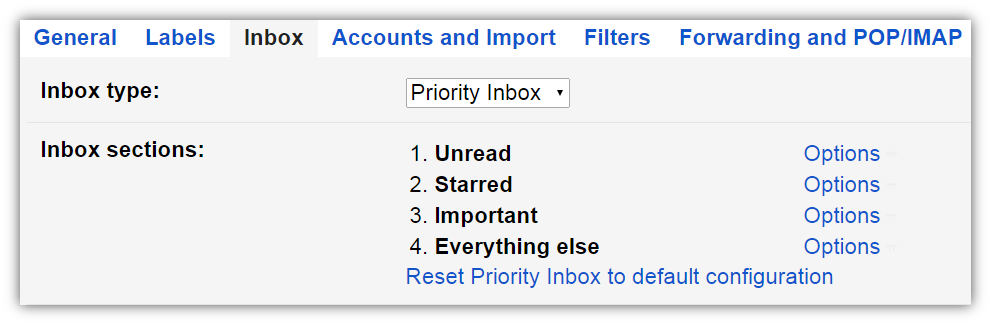
Although it’s not critical that your priority inbox is set up exactly like the one explained and pictured above, what is critical is that (1) an Unread section is at the top, (2) an Important or Starred section is in the middle, and that (3) an Everything else section is at the bottom (we will later create filters to “push” unimportant email into this section).
Now that you’re all set up, take a moment to watch how priority inbox works: Priority Inbox Video
All of the additional options that are critical to harnessing the the power and efficiency of Gmail are listed below. Next to each of these I’ve identified where the options are available, a short why summary, and perhaps a tip or two to get you started. Each of these tools will have their own full-blown discussion and explanation on this site in the very near future.
- Filters. Filters are most powerful when automated and used in conjunction with labels. Set up your first filter from this location: Settings gear > Settings > Filters. Now follow these steps: Create a new filter > From [Insert the email address of someone important to you] > Create filter with this search > place a check by Apply the label > Choose label > New label [name the label appropriately] > Create > Create filter.
- Labels. Manipulate these from your Gmail inbox home screen, or here: Settings gear > Settings > Labels. Labels are most powerful when automated by using them in conjunction with filters — AKA rules in Outlook parlance. Using the label created above, change the label color to a bright color and never miss an important email from this person again!
The rest of the options presented below can all be enabled in the Labs tab of Gmail Settings. There are many handy labs available, but I am only covering the labs either critical to employing the Evilsizor inbox zero methodology, or just necessary for increased productivity or efficiency. The steps to navigate to Labs: Settings gear > Settings > Labs
- Apps Search. This returns Google Drive documents (in addition to emails) as a part of the search results when you search your inbox, thereby saving you a series of clicks when you need to open something in Google Drive.
- Auto-advance. Automatically shows the next conversation (or email — remember emails are grouped in conversations in Gmail) instead of your inbox after you delete, archive, or mute a conversation. You can select whether to advance to the next or previous conversation in the General settings tab. This comes in extremely handy as you batch process emails (also a topic I’ll cover down the road).
- Undo Send. As I mentioned before, simpler to use than Outlook and it actually works. Just enable it already.
- Send + Archive. A core component of inbox zero. Learn to use it. I would explain why, but it’s impossible to do so in a brief manner.
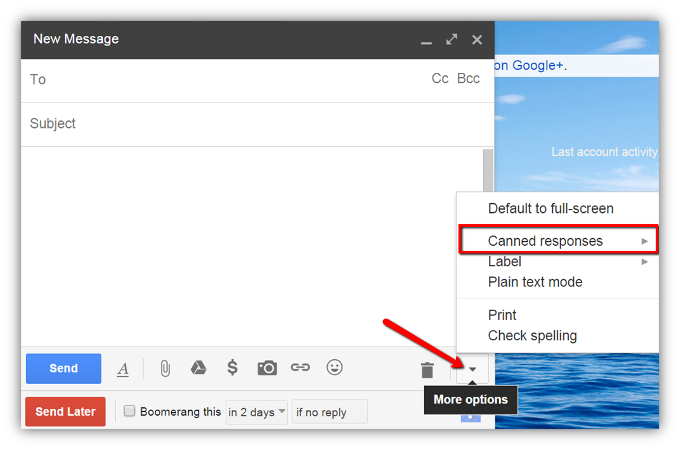
- Canned Responses. You can locate this option from the Gmail compose message screen as highlighted in the picture below. From here you can create new canned responses or insert canned responses into an email message. These are an incredible time saver for salespeople, recruiters, and others that send many emails and would benefit from easy access to multiple use email templates.
That’s it.
Each of the items listed in this article are the primary tools a Gmail user needs to enable, use, and become proficient with in order to begin building their own personal Inbox Zero Toolkit (IZT). There are a few additional tools available that completely round out the Evilsizor IZT, and I will discuss each of those in detail in forthcoming posts.
Also published on Medium.
I will immediately seize your rss feed as I can’t to find your email subscription link or e-newsletter service. Do you have any? Please permit me understand in order that I could subscribe. Thanks.
That is very fascinating, You are a very skilled blogger. I have joined your rss feed and sit up for searching for more of your wonderful post. Additionally, I have shared your site in my social networks!
Thanks Garland, much appreciated.
I’d been honored to obtain a call from my friend when he found the important recommendations shared on your site. Reading through your blog publication is a real great experience. Thanks again for thinking about readers at all like me, and I wish you the best of achievements as a professional in this field.